
Creating a Pub Table from an Upcycled Whiskey or Wine Barrel
- Rob Skomski
- Jan 20, 2025
- 6 min read
Updated: Jun 14, 2025
*Disclaimer: The links featured in the pages below are affiliate links. By using these at no additional cost, I may earn a commission on the products.*

Your home bar has a lot of cool decorative and functional decor, that makes it a relaxing and desirable place for you and your family, and friends to kick back and hang out. But, there’s always something that you can add, that is sure to take it to the next level of amazingness. What exactly can that be, when you’ve meticulously planned and created the ideal set up. Well, that one thing, just might be a pub table. This style of table is perfect for bars, because they are the ideal height to comfortably sit on a barstool, or stand next to, while resting your drink, or enjoying a snack. They also are perfect for game night, or just sitting and sharing stories with loved ones.

Now that the wheels are in motion, you need to ask yourself, do I have the means to put in the work, and do it with your own sweat and blood? If the answer is yes, then I would like to share some of the essentials you will need to make it all possible. There are also quite a few variations and options to make your table one-of-a-kind, so decide what direction you want to go in before getting all the materials.
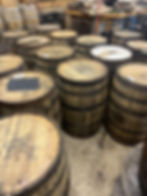
Phase 1: Getting your very own whiskey or wine barrel
Barrels are an essential part of America's history. From transporting food and grains, to storing provisions, to aging and enhancing alcoholic beverages, they have been utilized on nearly every front during the infancy of our great nation. Now, it is time to honor the oaken vessel, by giving it a new life in your home. After obtaining a barrel that is roughly 34.5” to 37” tall, you are going to want to get it cleaned up, and splinter free, to keep guests from getting smudges or ouchies.
Start by using a blunt chisel, and hammering the innermost metal hoops off of the barrel. You will want to keep the ones that are on each end, firmly in place, so the whole barrel does not fall to a bunch of loose oak staves! These hoops are all that holds it all together, so make sure the ends will remain on for the next step of this process.
Next is sanding the barrel from top to bottom, and each of the flat ends. I recommend using a 100 grit disc on an orbital sander, to get the barrel just right. One of these barrel “heads” might be visible, if you are planning to add a glass inlay, or only use a glass top. When sanding the head that will be visible, make sure to not remove any of the authentic distillery stamps or other interesting characteristics while sanding.

While the hoops are off, give those a sanding as well, along with the two that are still on the barrel. Next, have your stain that you have chosen, and get an old T-shirt or cotton rag. I like Varathane Early American, Dark Walnut, or Cherry, depending on how light or dark of a color the barrel will be. It is time to dunk the rag into the stain can, and wipe it evenly around the whole barrel, hoops and all on whiskey barrels. On wine barrels, I leave the hoops alone, as they are a galvanized metal, and look better polished or painted. After the stain is applied into all the little nooks and crevices, it's time to put the hoops back on.
Putting the hoops back on requires some eye/hand coordination, as you do not want to repeatedly whack your hand with the hammer, while focusing on keeping the same blunt chisel used for taking the hoops off, carefully seated while tapping them back down tight. Once the hoops are in place, and have been checked for even distribution by using a tape measure, it is important to secure them in place to keep the barrel sturdy for years to come. The most efficient, and aesthetically appealing screw is a black, self-tapping for whiskey barrels, and a silver self-tapping for wine barrels
 |  |
The self drilling, or self tapping tips eliminate pre-drilling a hole for the screw to go in. These screws should be used at least 6 equally spaced around each hoop, but for the most stability, every third or fourth stave should be secured with a screw.
Phase 2: Making the table top

A wooden table top can be made from your choice of dry lumber. For an economic choice, pine 2x4’s are a good choice. They are easy to glue up, cut, sand, and stain. Pretty much in that order, for this to go smoothly and according to plan. If you just want to put a tempered glass top on the barrel, add some silicone pads around the barrel top edge, and just center the glass top.
For a 42’ wooden top, you’ll need 5, 8’ long 2x4’s. Cut each into 4’ lengths, and run the edges through a jointer, or shave off a ⅛” on each side of the boards on a table saw. This will get rid of the rounded off corner, and eliminate recessed “ridges” where the boards are glued together.
Next, align your boards on a flat surface, and mock up the circumference in pencil to see if the size is big enough, and to lay out your biscuit locations. These will help add shear strength to the glued boards as they will slightly expand and contract as the wood moisture content changes with its environment. Use a biscuit tool to make the notch in the marked locations.
Spreading glue, such as Titebond II, evenly along each edge of the boards, stick your biscuits in as you work from one side to the other, finishing with 3 or 4 bar clamps on the top and bottom of the square workpiece. Alternating top and bottom keeps the boards from wanting to arch, and staying flat, while the glue dries overnight.
 |  |
After the glued boards have set, and the glue has dried for at least 12 hours, you can remove the clamps, and start to set up the process of cutting out the circumference of the table top. Using a router jig designed for cutting circles is the best way to ensure an even, true circle shape on the final product. For this process and when tasked with creating the means to set a glass insert into the top, the Milescraft Precision Circle cutting Jig makes any size any easy job.


When adding the glass inlay in the center, you have to router out a track, from about 24 ⅛”, to 22”, and the depth of the glass’ thickness. After this groove is complete, you can then cut out the middle, where the barrel will partially insert into. So, make sure the hole is adequate, because once you cut it out, you won’t have any material to attach the jig to, and therefore won’t be able to cut with the router anymore. If carefully and accurately done, there shouldn’t be a need anyway! If the glass fits, and the table fits around the barrel top, congrats! You can get ready to sand and stain.
Phase 3: Sanding, staining, and attaching the table top
Sanding is tedious, but an essential part to getting wood prepped for stain and sealers. Starting with 120 grit, thoroughly sand any rough or uneven spots, paying attention to leveling as much as possible. Work up to 220 grit, covering the top again, and finish with 320 grit. It is best to have a vacuum hooked up to your sander to be able to see your work, and know where to keep sanding, or when to stop. It also will help keep as much dust, as possible, from the air you are breathing. A dust mask and air cleaner are always recommended.


After you are finished sanding the top, you can then apply stain, and let it dry for 24 hours in a warm, low humidity space before applying polyurethane or another type of wood protectant. Such examples of these products are Danish Oil, or Osmo PolyXOil.
The final step is now to attach the table to your barrel. If it is a solid top, just attach four black (for whiskey, silver for wine), 2” L brackets evenly around the barrel top, down about ⅛” from the top edge. If doing a glass inlay top, set the top so the glass will be about ⅛” to 3/16” above the top edge of the barrel, so it can not contact the top metal hoop. Screw the underside of your table to the two remaining holes on the L brackets, and you now have a finished whiskey or wine barrel pub table.

I love these brackets for their heavy duty feel, and rounded edges. I not only use these for my pub tables, but for wall-mounted shelves, and for a few other products.
You are now ready to marvel, and be proud of what you have accomplished! A piece of American history has turned into a place of love, laughter, and memories for years, even decades to come, right in your own home.


