
Ready to Install Your Own Pallet Wall?
- Rob Skomski
- Feb 7, 2025
- 7 min read

Updated: Jun 11, 2025
Disclaimer: This article contains affiliate links for some of the products shown below. No extra charges are added, and I may earn a commission with any purchases from the links.
A step by step walkthrough on how to plan and what you’ll need to get it done.
This article is based on my experience with commercial and residential installs, and over a thousand happy customer testimonials and feedback.
Additional Disclaimer: You are about to view some of the greatest pallet wood accent walls known to mankind. They are a conglomeration of Red Fox customer photos, and some of my personal works.
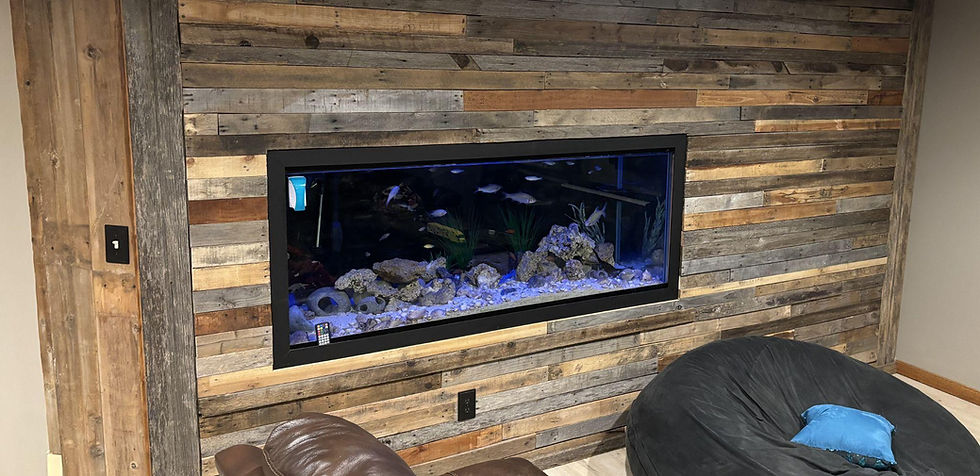
For quite a few years, repurposed materials, and rustic wood have been a mainstay in homes across the country. First, more of a conscious effort to recycle, and lessen waste on our planet has been an important role for many. Landfills are getting more and more full, and we all realize there must be something we can all do. Well, sitting outside many businesses, awaiting a haul away dumpster, is a source of reusable wood: pallets. Secondly, natural wood not only is a beautiful material for home decor, but also looks even more amazing when nature adds a grey patina: sunlight and precipitation oxidizing the wood. The older, and more weathered, the wood is, the more it brings back a feel of Americana.
 |  |

To really get the whole accent wall thing started, you will obviously need a wall, but it should be a focal point, or a unique area of the room. Perhaps there is a recessed area, a wall behind a bar or counter, or divider walls are also great because you can wrap around the wall, and tie the look of two separate rooms together. Also, two separate walls can be done in the same room, allowing for other materials to keep the wood from dominating the decor.
Once you have decided the area to be used, you must start by measuring the dimensions, height and width. You will need a good, easy to handle tape measure now, and throughout the entire job. I recommend this 25’ DeWalt/Stanley tape.
To calculate the square footage, multiply the height of the wall, by the length in feet. This square footage can be used to determine how much paint you’ll need prior to installing the wood, and how much wood is needed to cover the area. If the area has an angular section, try to take that area out of the dimensions, then turn it into a square or rectangle using the height times width, and divide by two, to get the area of the triangular area. Then, simply add that amount back into the area from the rest of the wall. You can also subtract the area taken up by any doors or windows in the wall, or just use that as the “overage allowance” of material. The overage allowance is what professionals calculate into the material quantities when figuring totals for a job. Since pallet wood is a very efficient material, you shouldn't need to figure more than 5% extra.
When you come to Red Fox Reclaiming to purchase your wood, I assist the customer by calculating the square footage of the boards being picked out, so the customer knows when they have enough to comfortably complete the job! I usually carry anywhere from 750-1,000 square feet of dry, naturally weathered wood, organized by size, inside my shop.
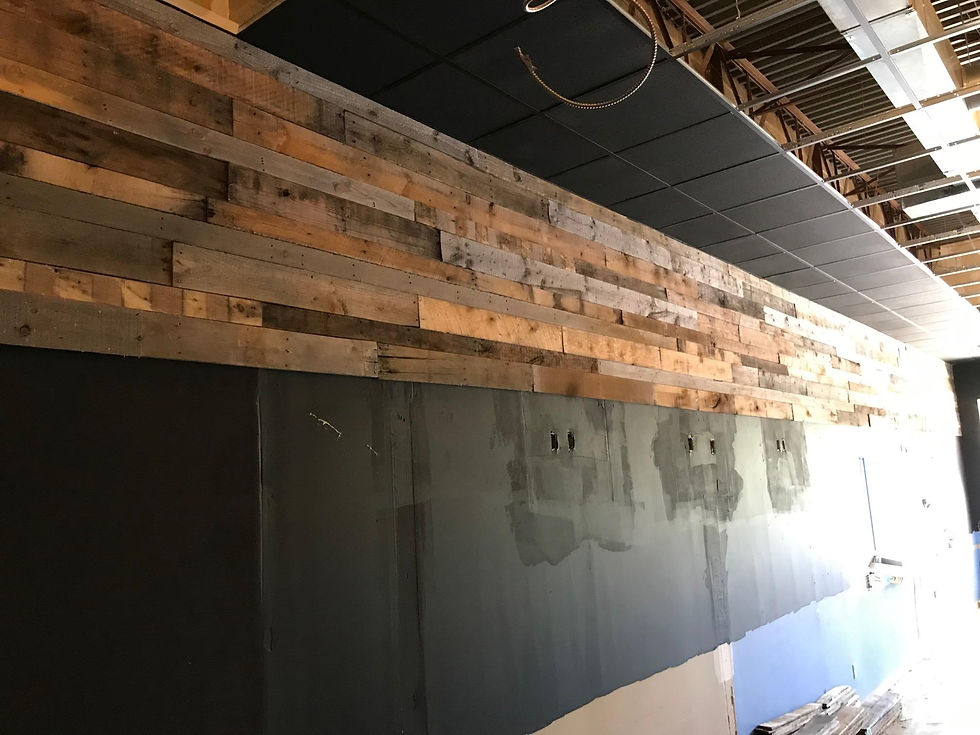
The first step of installation begins with painting the wall flat black, or dark matte brown. You can purchase inexpensive paint to do this step. No need for anything fancy. You can even take some old paint cans up to a hardware store, and see if they can tint it. The black substrate is designed to mask any gaps or spaces between the boards, at any given place, so you don’t have a garish white, or other non-matching color, that would stand out after all the wood is up. Since wood is made up of once living fibers, it will expand and contract, with changes in temperature and humidity. This may not occur very much, or possibly not at all, but usually no matter how hard you try, small gaps between the boards can appear in certain light conditions. Painting the wall black first, covers any potential spots where this might happen. I’ve had customers even install the wood spaced rather loosely, and it still looked good with the black background behind it!
 |  |
While the paint is drying, it is the perfect time to make sure you have your wood in the room of the installation, and the tools needed get gathered and staged in a good location. For example, if you plan to rip any boards to help match up the widths, you will need a table saw. It is a good idea to keep the table saw in an outdoor location, or a garage, to minimize dust inside a house or occupied space. I have been fortunate, where, it was a walkout basement, it could be right outside the door, wood cuttings aimed away from the house. Or, outside a restaurant where there was a conveniently located side door, to pop back and forth, without walking 20 miles total between cutting and nailing. If possible, match up board widths as close as possible to minimize the amount of ripping needed. I actually had enough wood on hand, when I did my basement, it needed zero ripping of boards. The advantage of having a large stock readily available, I suppose!

At the end of every row, you also will need to terminate a board up against the corner, edge, ceiling, or stopping point. For this, you can use a miter saw, a circular saw, or an oscillating tool. I don’t recommend a hack or hand saw, as you will get pretty worn out, and the cuts can get out of square or off the mark, making for a sloppy looking end result.

Ladders, or scaffolding are necessary for reaching higher up areas and staying safe while handling nail guns and holding up wood high off the ground. If you don't have access to scaffold, setting up multiple ladders can help save a lot of repositioning as you move side to side on the wall. As long as you are in your own home, you can put planks across the steps of two ladders and make your own “scaffolding”. I do not recommend employers do this to their employees. If you own a business, and this is part of the job, rent or buy the proper equipment!

To physically attach the wood to the wall, will require a brad nailer.
This small nail gun shoots small pin nails that are hard to see, after they are shot into the board, and through the substrate. I’ve had this same Bostich nailer through many installs, and it never has given me a single issue. Use 18 gauge by 1.5” to 1.75” brads,
to sufficiently, strongly and safely hold the wood tight. It’s not completely necessary in all settings, but I do recommend using a bead of Liquid Nails construction adhesive
on the backs of the boards as well. This is good for environments that experience changes in temperature or humidity, to keep the wood set in place even more permanently. Also, if you own a business, or have a location where there is high traffic, or customers, it is a good idea to always minimize any possible liabilities, regardless how slim the chances are, for any boards to fall off and land on a person or pet. Just sayin’.

In order to get your awesome new nail gun to shoot nails out of the tip, you have to have an air compressor, and a long air hose to help you reach the whole wall easily.
Keep a good 3’ or 4’ level
nearby, to make sure your rows of boards are staying on an even keel. Don’t forget to check every 4 or 5 rows for level. Once you really get in the swing of it, you may lose track, and go quite a ways without checking. I’ve had this happen, and usually, everything was looking pretty good! You can also mark some level lines on the wall, using your level, just as a visual guide

I have always done my installs starting at the ceiling, and worked down toward the floor. This allows a method of using 2x4’s to “jack” the rows tight into each other, and minimize gaps between the rows. Have a 2x4 on hand, a few inches longer than the row you are working on. Place it vertically, under the pallet board, on an angle, bottom resting on the ground. Tap the bottom of the 2x4 with a hammer toward the wall, and it will push up, or “jack” the pallet board up tight to the row above. Nail it firmly, and move on down until you need this again. If you are onto a lower row, simply cut the 2x4 to the new length to repeat the process.
That’s my little trick I learned in ‘Nam.
Now, it’s up to you to decide what part of your home or business is ready for a rustic renovation! Pallet wood will make an indoor living space feel warm and luxurious.
 |  |
It can also add a lot of charm to an outdoor three or four season room.

Why not try a pallet ceiling?

Add acoustical insulation to your home gym, as well as beauty!

Make a statement in your garage shop.

Or dress up (or down) the stairs in your home!
 |  |
I need to cut myself off from posting all of the incredible, unique, beautiful pictures, that I have acquired personally, and from customers sending them in after they have installed their Red Fox Reclaimed Pallet Wood! If you have any further questions, you can always send them directly to me via the website, email, or by phone.
Have fun with, and may the Lord bless your pallet project!


